
On Monday I talked about how every moment isn’t always “insta-worthy” and that’s ok, that’s life. However, when it is you want to make sure you capture the perfect picture!
As mentioned before or if you follow me (@meganpatty_) you’ll know that I’m a little “insta-obsessed”. I’ve always been one for visuals and instagram is full of beautiful photos and creative ideas! I love seeing people at the same event as me posting pictures that I would have never thought to take.
It’s a social media outlet that lets you be creative and positive! I find that sometimes Facebook and Twitter have become more of people’s venting outlets. And quite frankly, on a Saturday morning I’d much rather see 50 pictures of sprinkle covered donuts than read someone’s post about what ticked them off last night or my favorite are the videos like “You won’t believe what came out when she popped her pimple”. Uhm GROSS
Anyways, instagram is totally my jam and I always having people asking me about my photos so I wanted to share all my little square editing secrets with you:)
It’s a long one, but if you’re into instagram as much as me it’s totally worth it!
5 Essentials to Picture Perfect Instagrams
1. Camera/Shot
First and foremost, you have to use your camera correctly. Seems like an obvious one right? Surprisingly this one is the number one reason people’s photos don’t turn out how they would like. Their lens may be dirty or they are not focusing on the right thing. Here are a few tips:
Clean your lens: Always clean your lens, you may not realize it’s dirty or foggy until you take a photo and then it’s too late to take another one
Use phone’s camera: Always take your picture using the phone’s camera, don’t try shooting through a photo editing app
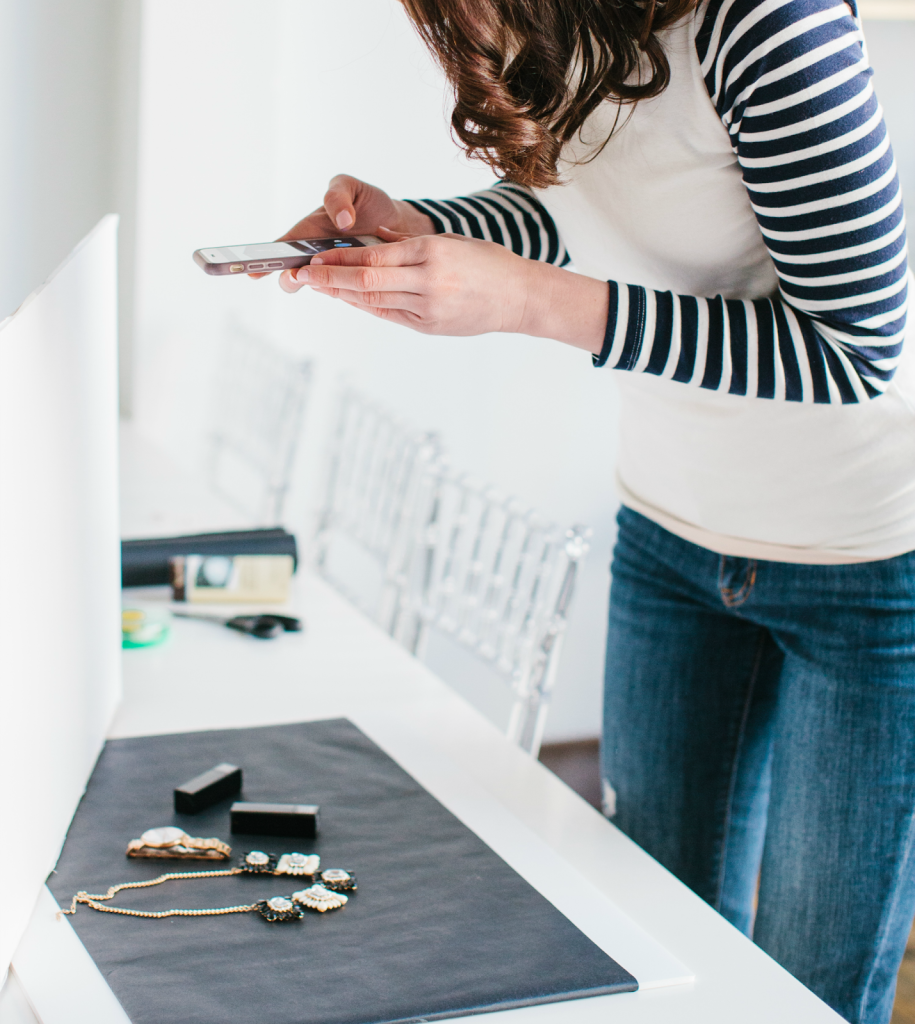
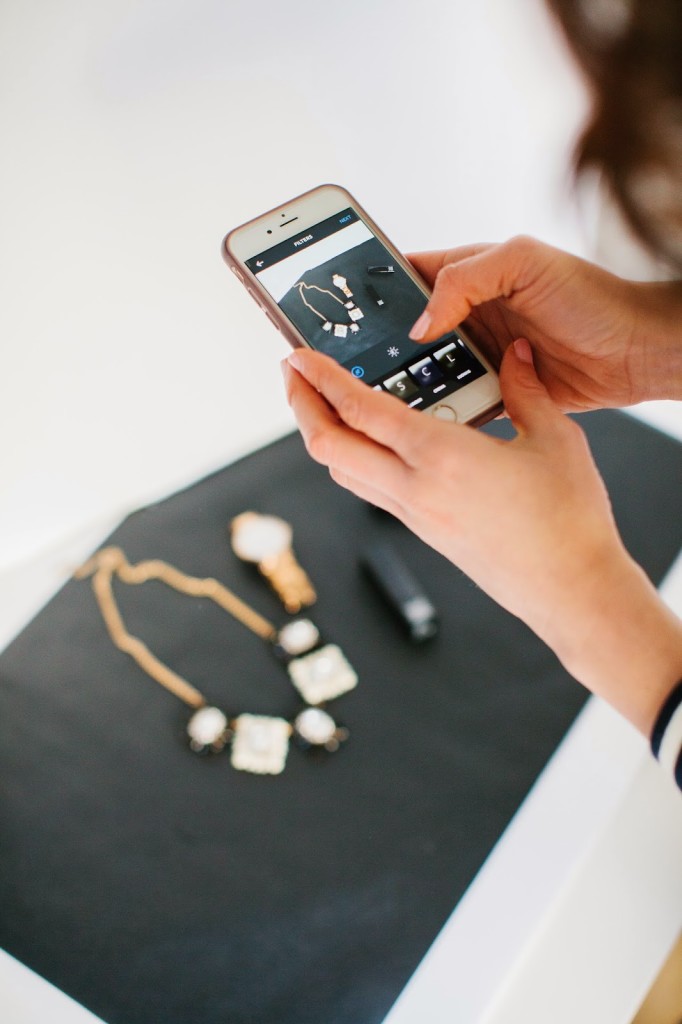
Shoot in square mode: Instagrams are squares so you want to make sure you are getting everything you want in the shot when it’s a square. I always shoot a little extra so I have room to crop it down later.
Focus on the object: Make sure to focus on the object you want to appear crystal clear. If you tap on the photo when shooting a little box will appear, this is your focus box. Be sure to tap where you want your focus to be. If the photo is a group of people tap the person in the center’s face as this will focus the group. If you are shooting an object such as the infamous hand holding a drink with a scenic background, be sure to tap the drink to blur the background.
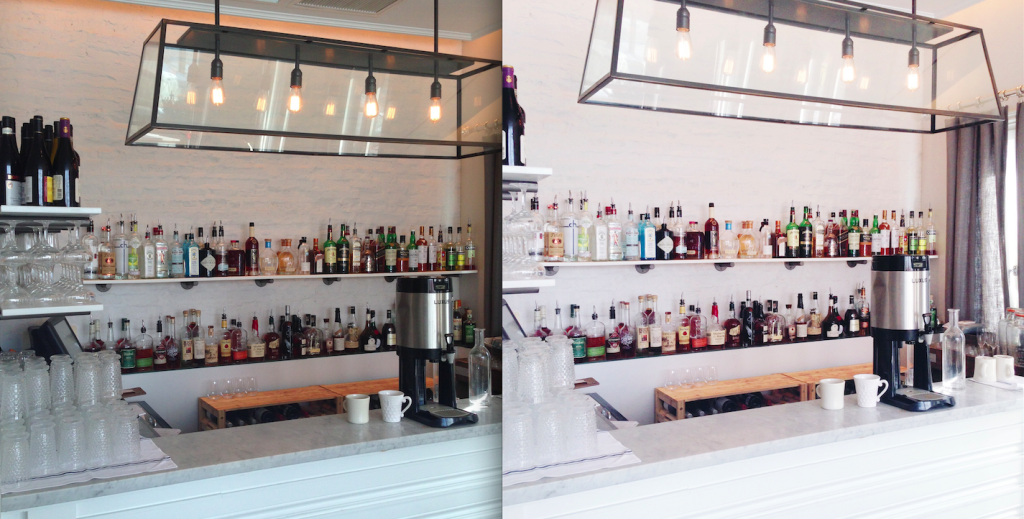
Get creative with angles: A lot of times people want to shoot straight on or above the objects, but the best photos are the ones that make you look like a complete weirdo in a crowd because you are on the ground getting a shot from below or squished against a wall to get the perfect side angle. Try to shoot the photo not how you see it but how it makes you think. For example I took a photo of the bar at brunch the other day and while it looked pretty straight on, it looked better from the side where you could see all the bottles lined up and some natural light was pouring in from the windows.
Take many pictures: I have that problem where my phone says “cannot take photo, storage full” almost every day. When I take a photo for instagram I take at least 10, different angles, different focuses, fix of the hair or just different lighting. You may not notice in one photo that your hand shook and its a little blurry or that you cut out an object you wanted in it, so I always suggest taking many pictures and switching each one up a little.
2. Background
This is where things get really fun! A backdrop can make or break your photo and everyone knows we don’t all have those perfectly white marbled counters or crisp white desks to create that white backdrop. I mean shoot if you’re like me, I don’t even have a desk in my studio and my counter is from the 1960s, covered in gold specks and cutting marks from the previous renter who never heard of a cutting board. However, I have a few tricks to creating that perfect backdrop from any room or capturing breathtaking backdrop views.
Use color and daylight: Remember your backdrop is usually 40% of your photo, so you want to make sure it’s crisp and eye catching. If you are using a scene for your backdrop, make sure it has contrast in colors and enough light to fill the shot. You don’t want to have to add so much light in editing that it dulls the picture.
Use your backdrop to tell a story: Instagram is all about sharing your life moments with your followers. Make sure your backdrop helps complete the story. For example awhile back I took a photo of a macaron in front of yoga mats, completely contradicting, however I captioned it explaining I was at a yoga party where we had macarons after. Or if you are at a restaurant and you want to shoot your drink, use the bar as your background instead of just an overhead shot with the table.
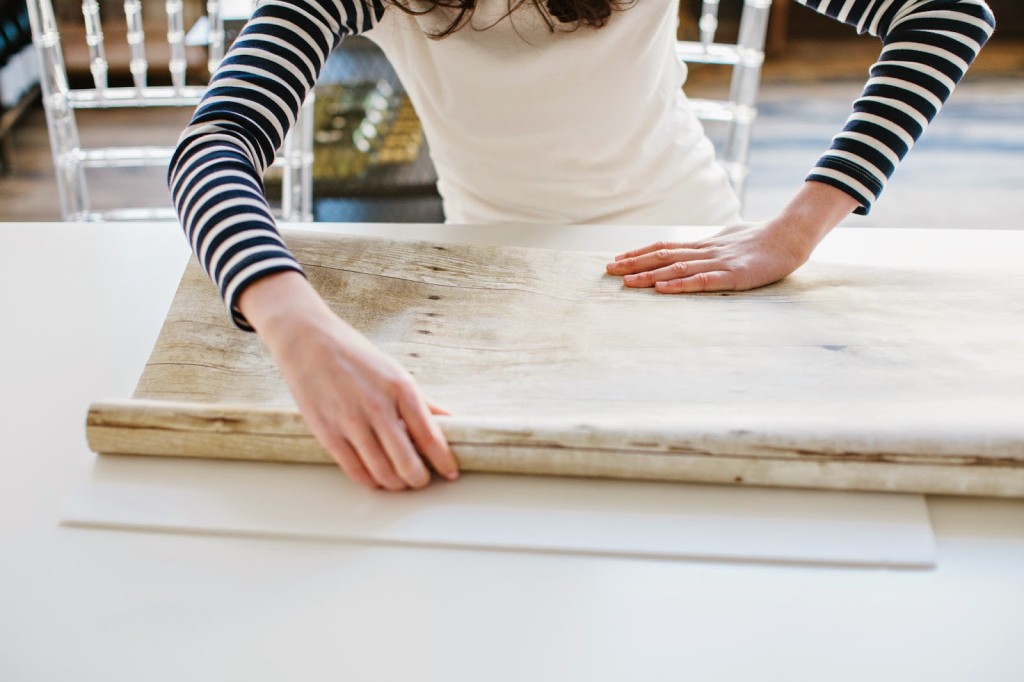
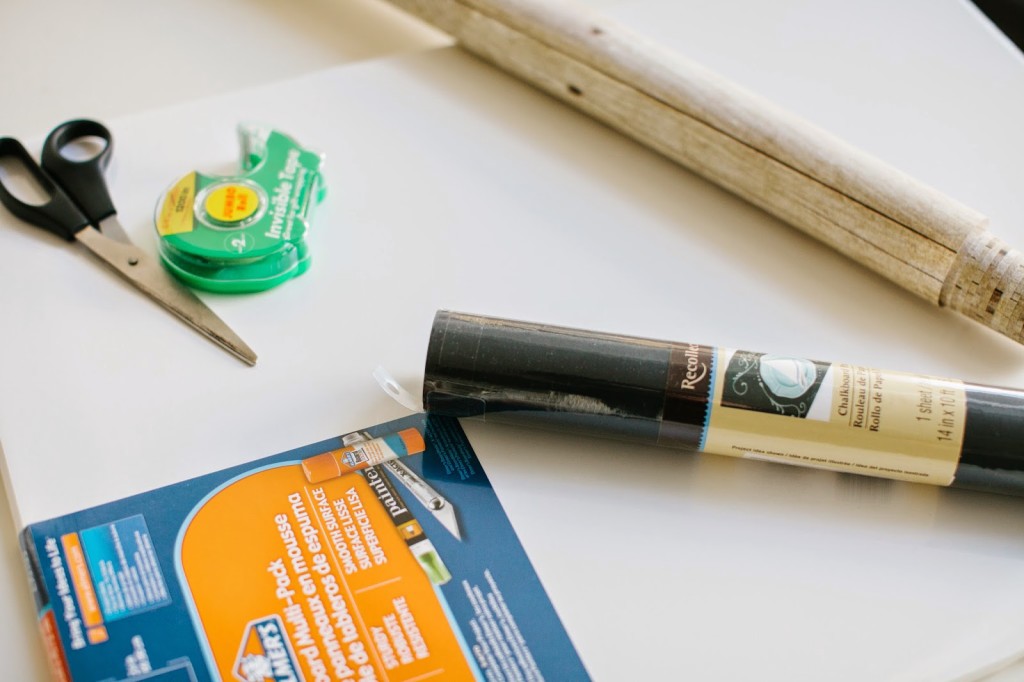
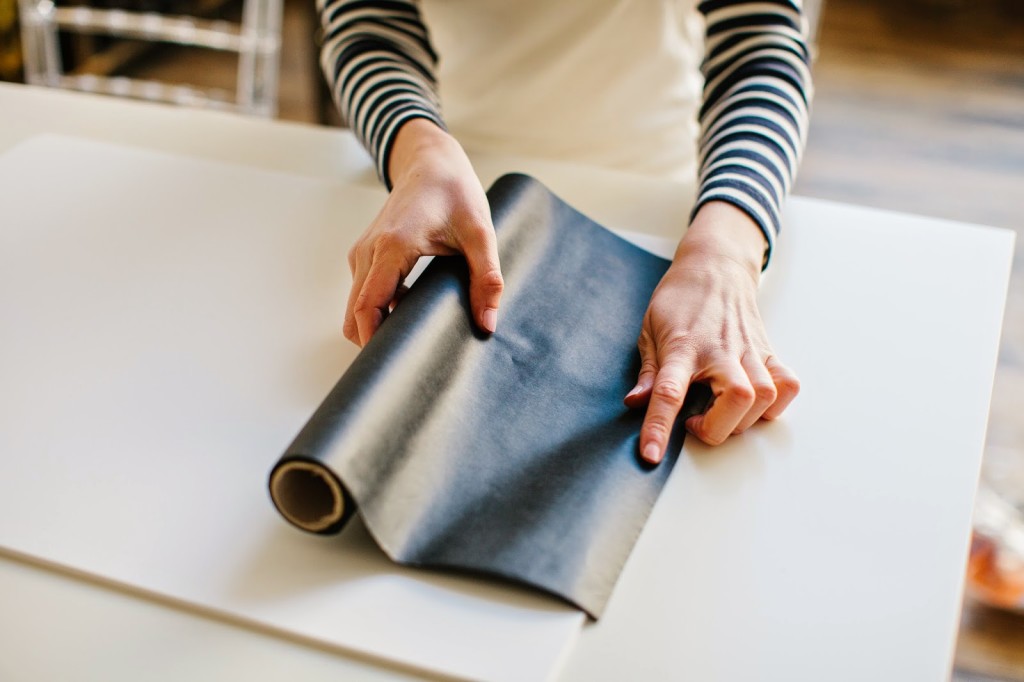
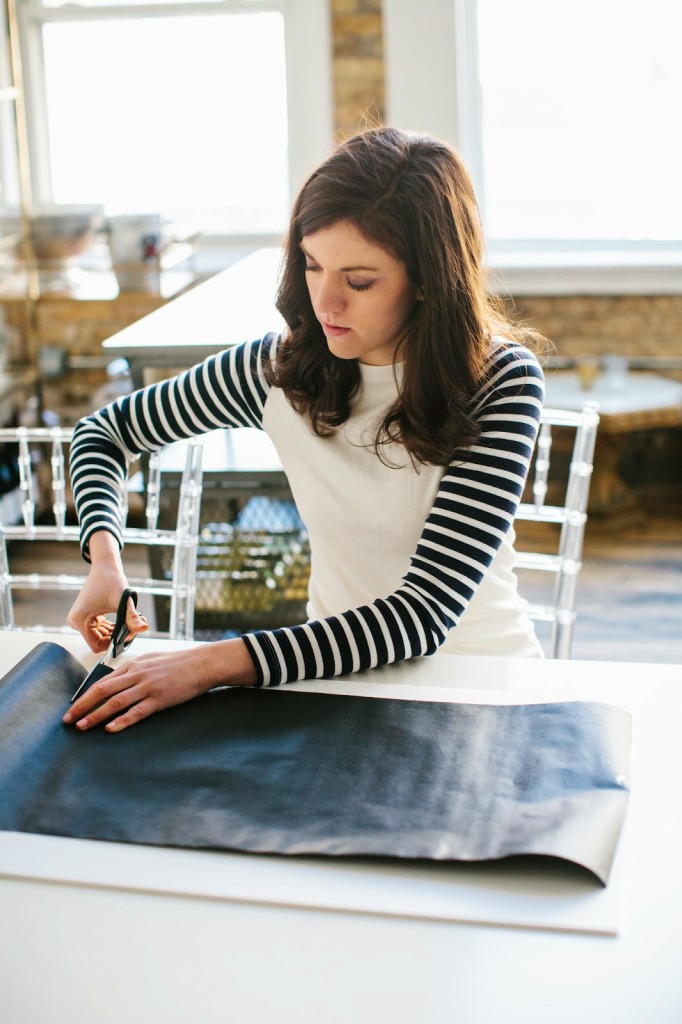
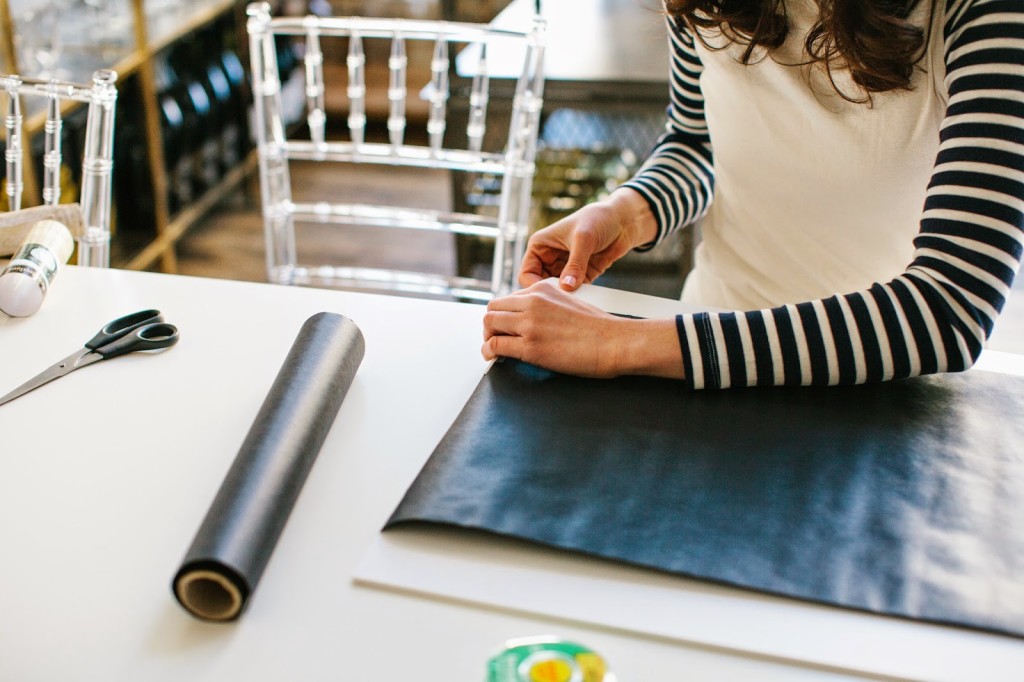
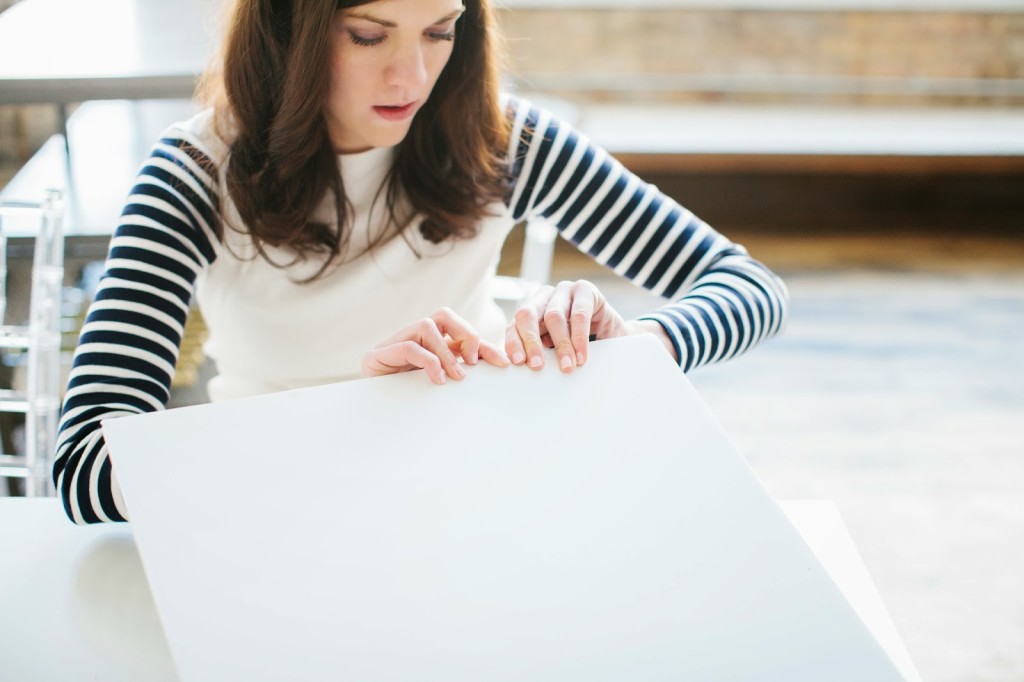
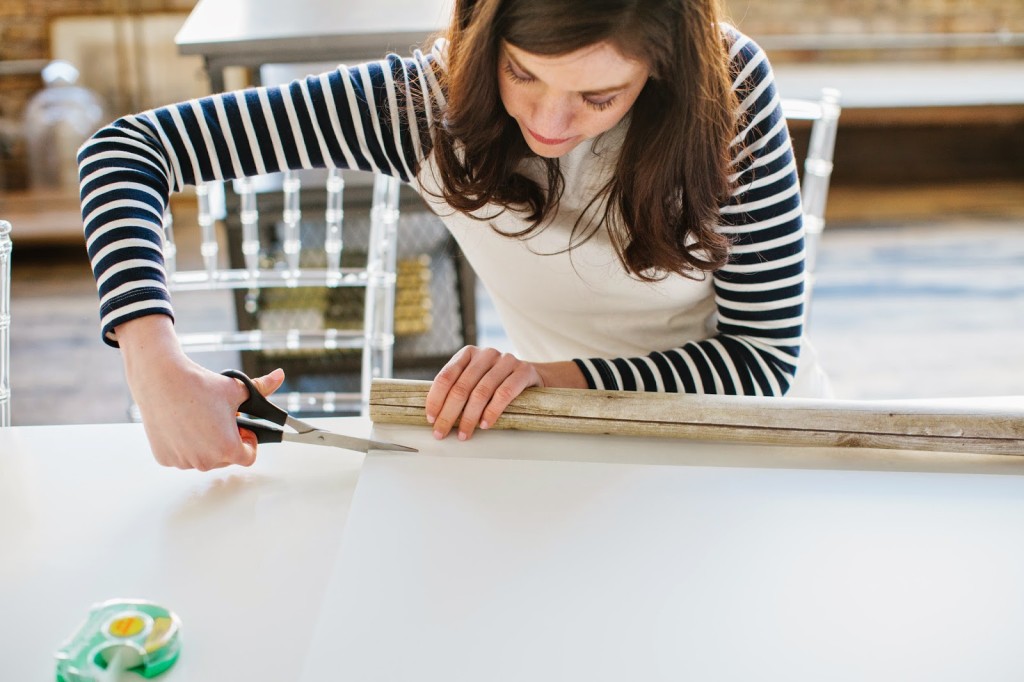
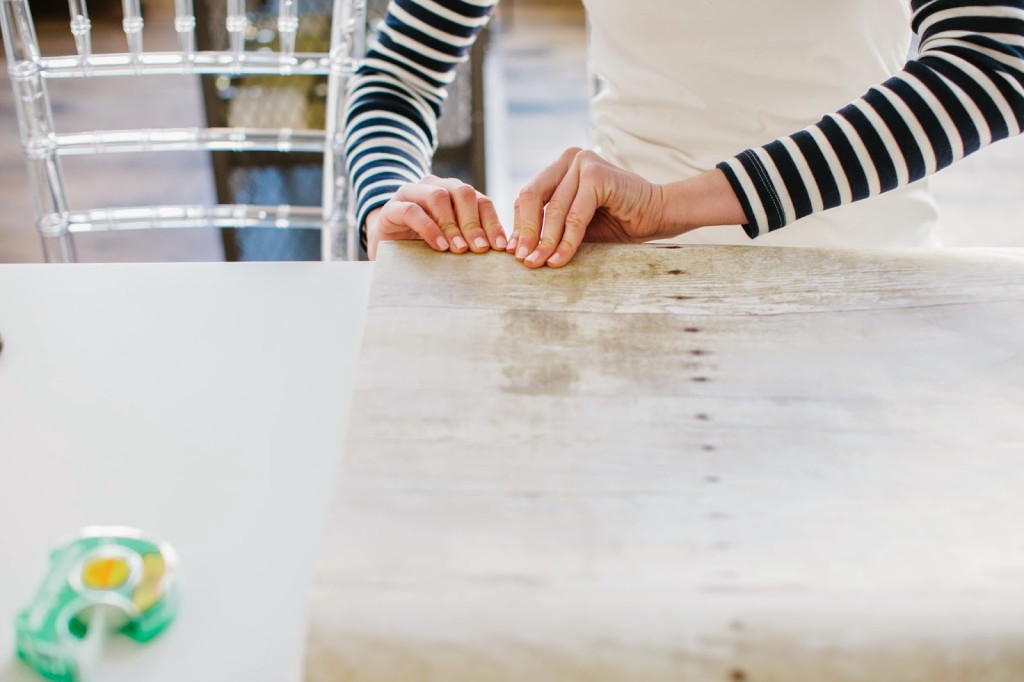
Create your own: One of my biggest tricks is creating my own backdrops, I have a little collection of foam boards behind my dresser that I use for backdrops and reflectors (more about that in the next section). Like I said, I don’t have a desk or pretty counter tops so I have created my own little backdrops to use. I picked up a few of my favorites from Michaels Craft Store and Home Depot such as this wood backdrop that everyone asked about for my scones shoot (yup, that was paper rolled out in my family room) and I recently found this countertop one that I ordered but am still waiting on (here and a cheaper version here). I also found this black chalkboard paper that I have not used yet, but am excited to find ways to! I use foam boards as the base, you can get these at your local craft store, and cover one side of them with the paper. I cut the paper to the exact size of the board and tape is on the edges so it doesn’t go over onto the other side. I only cover one side so I can use the other as a reflector.
3. Lighting
Lighting is the absolute most essential part of your photo. If you don’t have good light, you’re doomed…or I can show you how to fake it;)
Use natural light: I know we don’t always have time in the mornings to take our photos or are out and want a photo of something fun we are doing that night, but whenever possible it is best to use natural lighting.
Reflectors to minimize shadows: Here’s when I get a little intense…no judging. As I mentioned with the backdrops, I keep one side of the board white to use as a reflector. Feels like we’re going back to grade school science class right? The white board reflects the light back on the object to minimize shadows. When shooting objects I always place my objects on my backdrop and then my white board directly behind it and angled towards the light to brighten the photo and remove shadows. Sometimes you have to play around with the best angle to really catch the light. This is extra important when shooting inside at night. I always shoot in front of my kitchen lights (keep in mind my place is super old so my kitchen lights are those old style row of globe bulbs that looks like stage lights), so my best advice is use a light that is not directly above or you will get a glare on the object. Use the white board to bounce back the light onto your object. (picture below and above using reflectors)

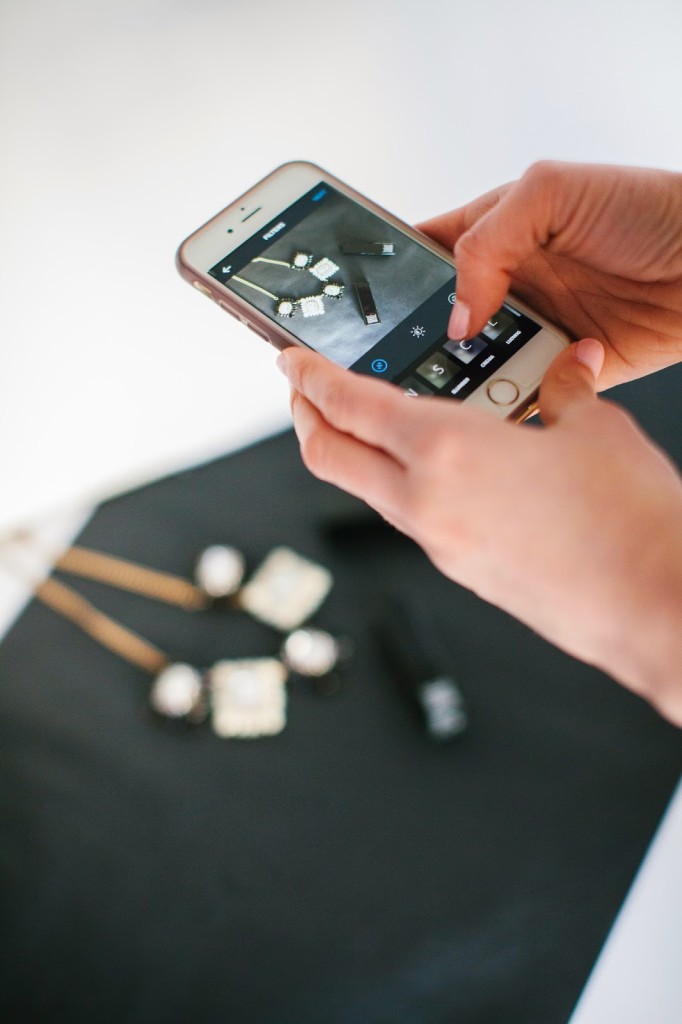
4. Editing/Apps
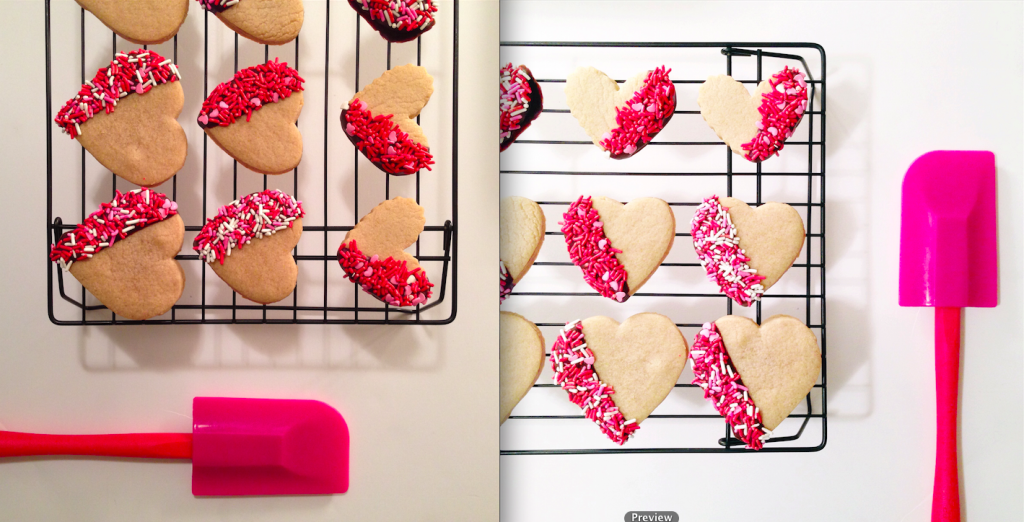
The moment we’ve all been waiting for..editing our photos. This may be the part that takes me the longest, but it’s worth the extra few minutes to get a good photo
Don’t use filters: I never use filters, I always keep it on normal and edit it with the tools.
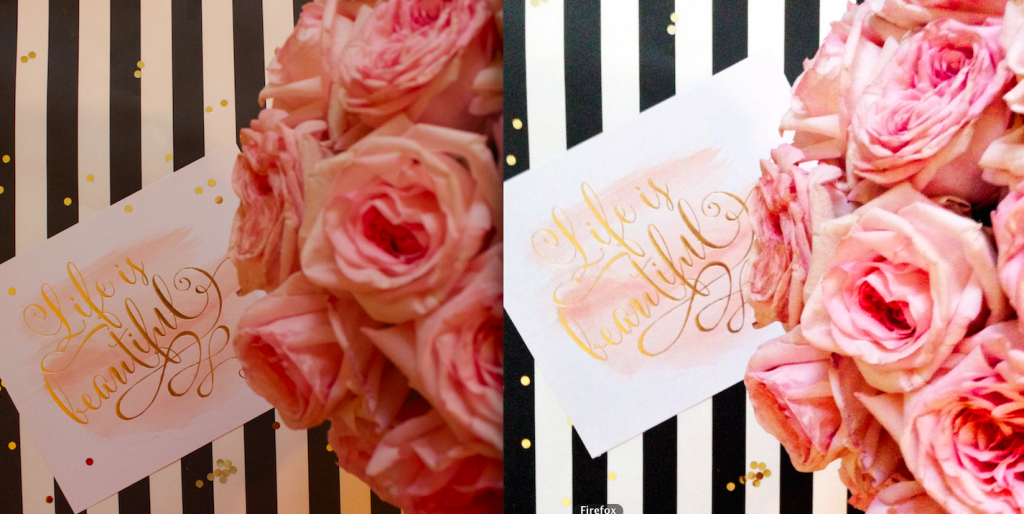
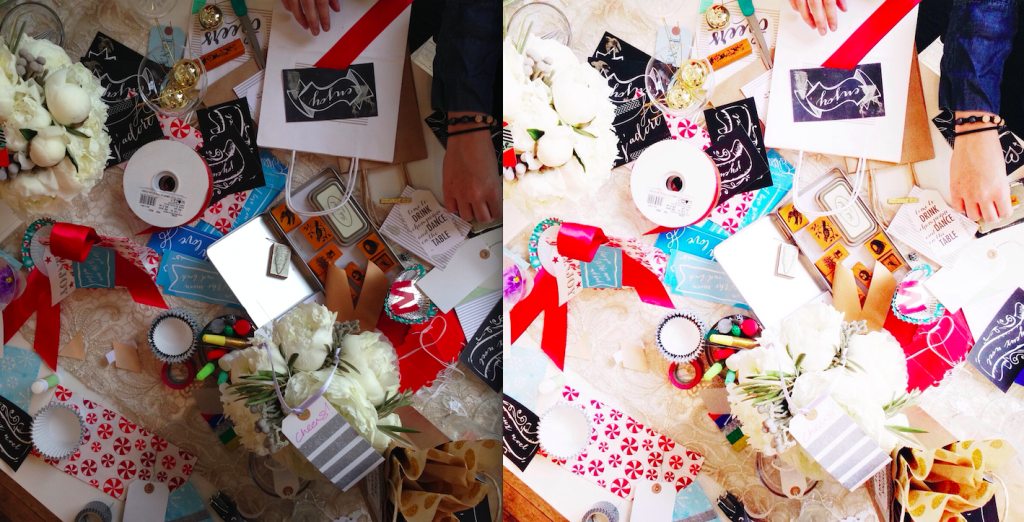
Instagram Tools Editing: First and foremost, distinguish what type of photos you like. Do you like dark and contrasted photos or bright and colorful photos. Use your style to determine your filters. I personally love bright and colorful photos, so the first thing I do is brighten my photo as much as I can without taking away from the object. I then play around with the contrast, highlights and shadows to make my images clear and crisp. If you took your image indoors at night as mentioned before, you may want to take off some of the warmth to get rid of the yellow overcast an indoor light gives off. This will help especially if you are using a white background.
Apps for Editing: When editing a photo my go-to app is Pic-Tap-Go. It’s super easy to use and you can save your “recipe” so you can stay consistent with your editing. You can crop your photo in here down to a square as well as tilt it to catch the object from a different angle. Then you can filter the photo and save it onto your camera roll or open it directly in instagram. My go-to filters on the app are: Lights On, Auto Contrast, Auto Color, Cool it Down (if I shot inside this helps eliminate that yellow lighting), + Contrast, Brightside and Air. Sounds complicated but I just add a little of each to tweak the coloring in my photos and then always end with Air to create a similar tone to all my photos. Another app I use is A Beautiful Mess to make collages or add fun phrases to my photos. I also would use this app a lot when I did social media for Warrior Dash races (yup, I helped with the mud runs…finding this voice was a real struggle at times), but we used an app called Phonto to add words to our pictures. I haven’t used it in awhile, but it’s a great app if you like adding text to your photos.
Here are a few examples of before and after editing photos I did recently
5. Overall Tips
Last but not least, leaving you with a few things to keep in mind when it comes to instagram. I’m still working on the whole building a following, hopefully I’ll be able to report back about that soon;), but in the meantime here are a few final takeaways
Tell a story: Your instagram should tell your followers a story (wise words from the lovely Jess Keys). Whether it’s sharing fun moments with your friends or products for your company. People aren’t looking on instagram for advertisements or photos of things that went wrong (there’s snapchat for those funny and awkward moments). Post pictures that tell a story to your followers so they will want to continue following along.
Create a tone: If you are looking for new feeds to follow, the first thing you do is a quick scroll through their homepage to see what type of photos they post. Create a style/filter and stay consistent with it to create an overall tone. If all your photos have a pastel look, make sure you post photos with color and filter them to pastel.
Be yourself: Most importantly people are following you for you. Be yourself when posting or captioning. It’s ok to regram here and there or if the picture fits your tone and you really like it, but most of the time try to post original photos. People are following along to see what you are up to, not the other accounts you follow.
Photography by Samantha Elizabeth
Space: DL Loft
And that’s a wrap! Sorry for the extra long post, but after so many questions about my instagram I had to share what I’ve learned with you all. Do you know any good instagram tricks or tips? Please share below!
Thank you for that tips! Lovely! And thank you for apps, I just was looking for good ones. And did you hear about app zen-promo.com that finds real followers on instagram? I looked and it seems pretty fine tool. What do you think?